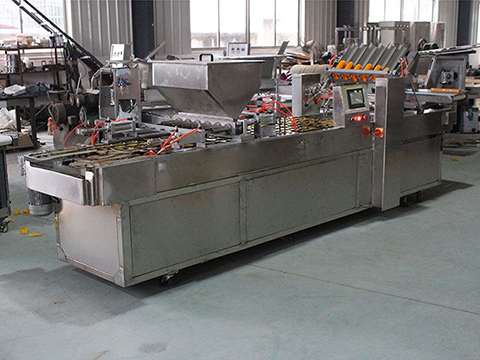
The installation process of the paper cup feeding machine is divided into four stages. In the pre-installation stage, unpack and inspect components, and prepare the site (including space, power supply, air source, etc.). Next, conduct mechanical positioning and fixing, as well as electrical and air circuit connections. Then, complete debugging through mechanical debugging, program setting, linkage and load testing. Finally, train operators and maintenance personnel, conduct acceptance, and confirm indicators such as cup dropping success rate.
Phase 1: Pre-Installation Preparation
Unpacking Inspection:
Check all components, accessories, and tools carefully against the equipment packing list to ensure no missing items or transportation damage.
Main components usually include: main frame, cup-dropping head, vibratory bowl or cup storage bin, control system, air pipes, power cords, instruction manual, etc.
Site Preparation:
Space Location: Reserve an accurate installation position on the conveyor belt of the cake production line. Ensure there is sufficient space around the equipment for operation, maintenance, and adding paper cups.
Power Supply: A power socket meeting the equipment requirements (usually 220V, 50Hz) should be available nearby. Ensure the power supply is stable and reliable, and proper grounding is done.
Air Source: The equipment requires clean, dry compressed air. Lay the air pipeline near the equipment in advance, and prepare a pressure regulator and filter (air source triplet: filter, pressure reducing valve, oil mist lubricator).
Environment: The equipment should be installed on a level, solid floor or platform without violent vibration.
Levelness: Use a level ruler to check if the installation platform is level, as this is crucial for the stable operation of the equipment.
Phase 2: Mechanical and Electrical Installation
Mechanical Positioning and Fixing:
Carefully move the main machine to the predetermined position.
Secure the equipment firmly to the conveyor belt frame or workbench using anchor bolts or clamp devices to prevent displacement due to vibration during operation.
Adjust the height of the equipment and the position of the cup-dropping head to ensure precise alignment with the height and hole positions of the cake molds (baking trays).
Electrical Connection:
● Power Connection: Connect the equipment's power cord to the prepared power socket. (Note: Ensure the power switch is turned off before connection!)
● Signal Line Connection (if required): If the equipment needs to be linked with the main control system of the production line or with front/rear grouting machines, connect the communication or trigger signal lines according to the instruction manual.
Air Circuit Connection:
● Connect the air source pipeline to the equipment's air inlet through the air source triplet.
● Very important: Adjust the pressure reducing valve to set the air pressure to the working pressure required by the equipment (usually between 0.5~0.7 MPa). Too low pressure will cause unstable cup suction, while too high pressure may damage the paper cups or air cylinders.
Phase 3: Debugging and Trial Operation
This is the most critical step, directly determining whether the equipment can work normally.
Power on and Air on:
Turn on the air source and check for air leaks in the air circuit.
Turn on the equipment's power switch.
Mechanical Debugging:
● Adjust Cup Picking Position: Calibrate the position of the cup picking head (suction cup or gripper) in manual mode to ensure it can accurately descend to the center of the stack of paper cups.
● Adjust Cup Dropping Position: Manually trigger the cup dropping action, observe the dropping trajectory of the paper cups, and fine-tune the front, rear, left, and right positions of the cup-dropping head to ensure the paper cups can 100% accurately fall into the mold holes without tilting or bouncing.
● Adjust Separation Mechanism: For vacuum suction cup types, adjust the position of the suction cups and the vacuum degree; for mechanical claw types, adjust the opening and closing range.
Program Setting:
● Set Working Mode: Select automatic/manual mode.
● Set Timing and Delay: According to the running speed of the conveyor belt, set the delay time for cup picking and dropping to ensure the actions are synchronized with the movement of the molds.
● Set Counting and Alarm: Set the number of cups per row of molds and the number of cups per stack, and test whether the low material alarm function is sensitive.
Linkage Debugging:
Start the entire production line and run it in automatic mode.
Observe whether the equipment can be correctly triggered by the photoelectric sensor on the conveyor belt.
Check whether the cup releasing rhythm is completely matched with the mold hole positions, and test at different speeds.
Load Test:
Fill the cup storage bin with paper cups and conduct a long-term continuous operation test (for more than 30 minutes) to observe its stability and reliability.
Phase 4: Operation Training and Acceptance
Training:
The supplier's engineers should train the customer's operators and maintenance personnel, including:
● Daily operation procedures.
● How to replace paper cups of different specifications and adjust the equipment.
● Daily maintenance and cleaning methods (such as cleaning suction cups, draining the air circuit filter).
● Troubleshooting methods for common faults (such as cup jamming, cup shortage).
Acceptance:
Conduct a final acceptance test with the customer to confirm that the equipment meets the technical indicators agreed in the contract:
● Success Rate: After hundreds of continuous operations, the cup dropping success rate should be higher than 99.5%.
● Production Efficiency: The speed meets the production rhythm requirements.
● Complete Functionality: All alarm and counting functions are normal.